

Before initialization of the Security Manager, it needs to be configured. Configuration provides data that allows the Security manager to connect with a directory and the Security Manager database. Certificate algorithms, lifetimes and other options for the Certification Authority (CA) can also be selected.
Configuring the Security Manager is available only once, so be careful during the following steps. Try not to make a mistake! While some of the settings can be changed by editing the entmgr.ini file it may be necessary to completely uninstall and then reinstall Security Manager.
The configuration data can be entered directly into the Security Manager wizard or specific files (entconfig.ini or entrustdirectorysetup.ini) can be changed.
To configure Security Manager on Windows, follow the next steps.
-
Log in to Windows (use the same user account that was used for installing the Security Manager).
-
Run the Security Manager configuration as an administrator.
On Windows Server 2016 go to Start > Entrust Authority (TM) Security Manager, then right-click on the Security Manager Configuration and select Run as administrator (this can prevent file copy operation errors).
a. On the Windows Server 2012 R2, click on Start then click the down arrow to access the Apps. Right-click on the Security Manager Configuration and select Run as administrator. When listed by name or category, the Security Manager Configuration is listed under Entrust.
b. The Entrust Authority (TM) Security Manager Configuration dialog box appears.
-
Click Next to bring up the Security Manager License Information page.
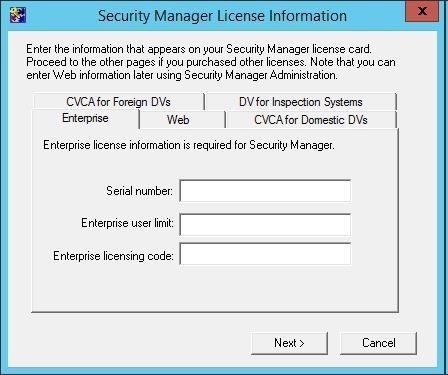
The Security Manager License Information page
-
Enter the Security Manager license information.
-
Under the Enterprise tab, enter your Enterprise license information. These fields are mandatory.
-
Enter the information under the Web tab if you purchased a Web license (you can configure it also by changing
entmgr.inifile). -
To configure the Security manager as a CVCA, enter the license information into tabs CVCA for Foreign DVs and CVCA for Domestic DVs (for managing domestic or foreign Document Verifiers). Configuration changes are also available by configuring the
entmgr.inifile. -
Enter your Document Verifier license information under the DV for Inspection Systems to configure the Security Manager as a Document Verifier (or change the
entmgr.inifile).
-
Click on Next to continue. Security Manager Data and Backup Locations page will appear.
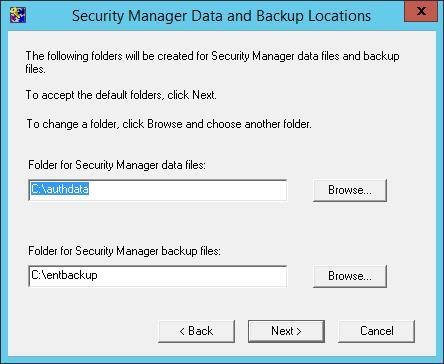
The Security Manager Data and Backup Locations page
-
Choose where the Security Manager data and backup files should be stored.
-
In the Folder for Security Manager data files field, enter the path for the Security Manager data files (by default it is
C:\authdata). The drive should use an NTFS file system. -
In the Folder for Security Manager backup files field, enter the path for the Security Manager backup files (by default it is
C:\entbackup). The drive should use an NTFS file system. -
Click Next to continue to The Directory Node and Port page.
-
If you are using Microsoft Active Directory, proceed to Step 7. If you are using Active Directory Lightweight Directory Services (AD LDS), proceed to Step 8. If you are using an LDAP directory, proceed to Step 9.
-
-
To configure the Security Manager for Active Directory:
-
Select Microsoft Active Directory, see the figure below.
-
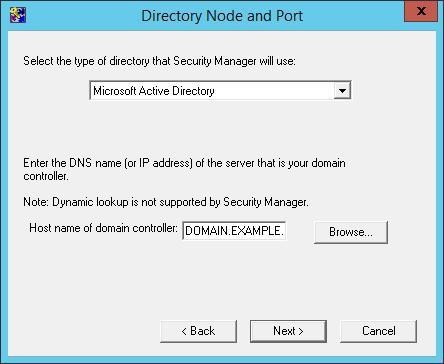
Choosing Microsoft Active Directory as the type of directory
b. In the Host name of domain controller field, enter the DNS node name or IP address of the server hosting Microsoft Active Directory.
c. Click Next to continue, which opens the CA Name page.
d. If a CA entry was created in the Active Directory by using the Entrust Configuration Wizard for Microsoft Active Directory, enter the common name of the CA entry in the CA common name field. By default, the Security Manager configuration program uses the name of the currently logged-in user to determine the relative distinguished name (RDN) value of the CA entry in the AIA container. For example: cn=CA,cn=AIA,cn=Public Key Services,cn=Services,cn=Configuratio n,dc=Company One,dc=com
-
If the CA entry was created manually outside of the AIA container, select Edit CA DN and then enter the distinguished name of the CA entry you created.
e. Click on Next to continue. Confirm the distinguished name of the CA if the CA DN is correct.
f. Click on Yes, if the DN of the CA entry is correct. Otherwise, click on No.
g. Proceed to Step 10.
-
To configure the Security Manager for Active Directory Lightweight Directory Services (AD LDS), follow the steps.
-
In the drop-down list, select Microsoft AD LDS.
-
In the Directory node name field, enter the DNS node name or an IP address of the server hosting the AD LDS.
-
In the Directory listen to port field, enter the port that AD LDS listens to for requests.
-
Click Next, which will open the CA Distinguished Name and Password page. See the figure below.
-
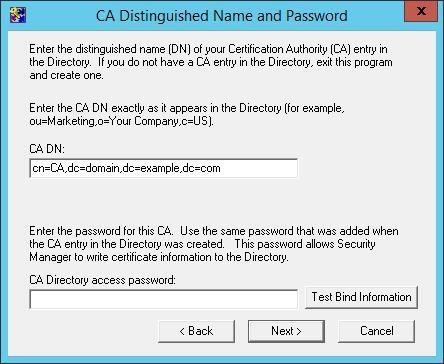
The CA Distinguished Name and Password page
e. In the CA DN field, enter the distinguished name (DN) of the CA entry.
f. In the CA Directory access password field, enter the password for the CA entry.
-
Click Test Bind Information to determine if the CA DN and password are correct. The configuration tool attempts to connect to the CA with the information provided. Correct the information if necessary.
g. Click on Next to continue. The Directory Administrator Distinguished Name and Password page will appear, see Figure 8.
h. In the Directory Administrator DN field, enter the distinguished name (DN) of a user with directory administration privileges. This entry will be used to connect to the directory to add, modify and delete directory entries.
i. In the Directory access password field, enter the password of the Directory Administrator.
j. Click on Test Bind Information to determine if the Directory Administrator DN and password are correct. The configuration tool attempts to connect to the Directory Administrator with the information provided. Correct the information in the fields if necessary.
k. Click on Next to continue.
l. Proceed to Step 10.
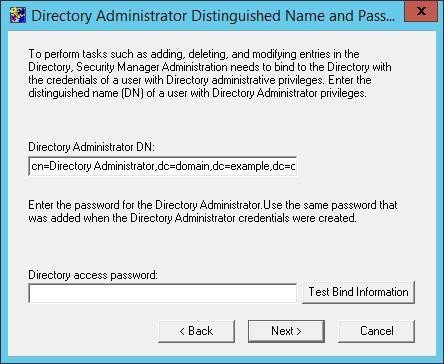
The Directory Administrator Distinguished Name and Password page
-
To configure the Security Manager for an LDAP directory, follow the steps below.
-
Select the LDAP Directory.
-
In the Directory node name field enter the DNS node name or IP address of the server hosting the LDAP directory.
-
In the Directory listen to port field, enter the port that the LDAP directory listens to for requests.
-
Click on Next, which will open the CA Distinguished Name and Password page, see the figure above.
-
In the CA DN field, enter the distinguished name (DN) of the CA entry.
-
In the CA Directory access password field, enter the password for the CA entry.
-
Click on Test Bind Information to determine if the CA DN and password are correct. The configuration tool attempts to connect to the CA entry by using the information provided. Correct the information in the fields if necessary.
-
Click on Next to continue. The Directory Administrator Distinguished Name and Password page will appear, see the figure below.
-
In the Directory Administrator DN field, enter the distinguished name (DN) of a user with directory administration privileges. The Security Manager Administration uses this entry to connect to the directory to add, modify and delete directory entries.
-
In the Directory access password field, enter the password of the Directory Administrator.
-
Click on Test Bind Information to determine if the Directory Administrator DN and password are correct. The configuration tool attempts to connect to the Directory Administrator entry by using the information provided. Correct the information in the fields if necessary.
-
Click on Next to continue.
-
-
The Advanced Directory Attributes page appears, see the figure below.
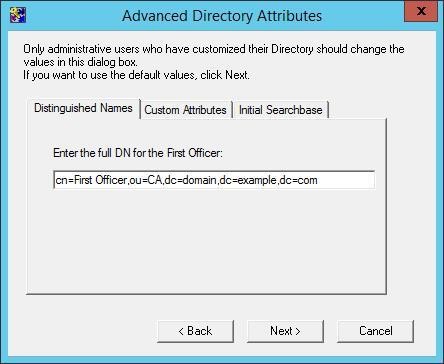
The Advanced Directory Attributes page
a. Click on the Distinguished Names tab.
b. In the Enter the full DN for the First Officer field, enter the distinguished name of the First Officer (by default: "cn=First Officer”, followed by the distinguished name of the CA).
c. Click on the Custom Attributes tab.
d. In the text field, enter the attribute your directory uses for email addresses (the "mail" attribute in most cases).
e. Select Include email addresses in subjectAltName values of user certificates to include the email addresses in the subjectAltName extension of user certificates.
f. To include the Microsoft userPrincipalName attribute value in the subjectAltName extension of user certificates, select Include the Microsoft(R) userPrincipalName in subjectAltName values of user certificates.
g. Click on the Initial Search base tab.
h. Enter the distinguished name of the initial search based on user entries.
i. Click on Next.
-
The Verify Directory Information page appears, see the figure below.
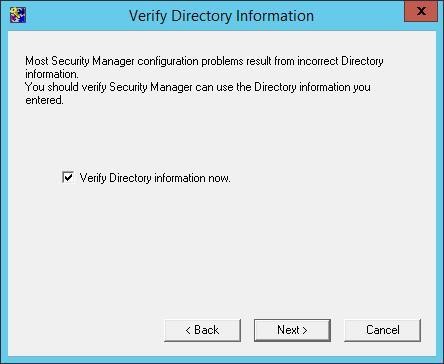
The Verify Directory Information
a. To run the Entrust Directory Verification Tool and verify your directory information, select Verify Directory information now.
b. Click on Next.
c. If you chose to verify your directory information, the Entrust Directory Verification Tool runs, and you will be prompted with the ENTDVT Logfile page.
-
This page displays the results of directory verification, as well as configuration information. This information is saved in the
entdvtdetails.logfile. By default, this file is located in:C:\Program Files\Entrust\Security Manager\10.0.0\Tools\dvt\.-
At the end of the log file, you will see notes, errors and fatal errors.
-
If the tool encountered any problems, scroll through the log file to determine which tests failed and the exact nature of the problem. Resolve if necessary (go back or run the configuration again).
-
Click on Next if there were no problems.
-
-
The Current User’s Windows Login Password page appears.
-
In the Password field enter the password for the Windows account (Windows ID).
-
If you want to enable autologin, select Enable autologin for automatic service startup which manually starts the Security manager service without requiring the Master User to manually start it. This may cause a security risk.
-
Click Next to continue.
-
-
By selecting the ODBC, the Data Source page appears.
-
Select
EASM_Entrust_PostgreSQL. -
Click on Next to continue.
-
-
The Database User and Password page appears.
-
In the Password field enter the password for the database user that was chosen, when the PostgreSQL database was installed.
-
Click Next to continue.
-
-
The Database Backup User and Password page appears.
-
In the Password field enter the password for the database backup user that was chosen, when the PostgreSQL database was installed.
-
Click Next to continue.
-
-
The Security Manager Port Configuration page appears.
The host network interface card (NIC) must be enabled before configuring the ports.
a. In the Security Manager node name field enter the DNS hostname or IP address of the server hosting the Security Manager.
b. In the Proto-PKIX listen to port field enter the port to use for the Entrust Proto-PKIX subsystem. The default port is 709.
c. In the Administration subsystem listen to port field enter the port to use for the Administration Service Handler (ASH) subsystem. The default port is 710.
d. In the PKIX-CMP subsystem server port field enter the port to use for the PKIX-CMP subsystem. The default port is 829.
e. In the Entrust XML administration protocol port field enter the port to use for the XML Administration Protocol (XAP) subsystem. The default port is 443 (do not use this port if you are planning to use SSL) or 1443.
f. Click Next to continue.
-
The CA Type page appears.
-
Select the type of the CA to configure (Root CA, Country Signing Root CA (CSCA) or Subordinate CA).
-
Click Next to continue, which will bring up the Cryptographic Information page, see the figure below.
-
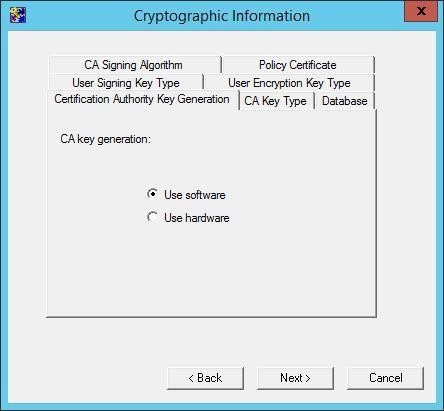
The Cryptographic Information page
-
Click the Certification Authority Key Generation tab. Select between storing the CA keys on software or hardware.
-
Click the CA Key Type tab.
-
Select the key pair type (RSA, DSA or EC) to use as the CA keys. Note that not all Security Manager client applications support all the available algorithms.
-
In the Parameters drop-down list, select the key size (RSA or DSA) or the domain parameters (EC) for the CA key type.
-
-
Click the Database tab. Select the encryption algorithm that you want to use to encrypt and protect data in the Security Manager database for software-based database protection.
-
Click the User Signing Key Type tab.
-
Select the key pair type (RSA, DSA or EC). This will be used for user signing and nonrepudiation keys.
-
Select the key size (RSA or DSA) or the domain parameters (EC) for the user signing and non-repudiation keys.
-
-
Click the User Encryption Key Type tab.
-
Under Encryption and Dual Usage Keys select the key pair type (RSA or EC) that users will use for encryption operations.
-
Select the key size (RSA or DSA) or the domain parameters (EC) for the user encryption and dual usage keys.
-
-
Click the CA Signing Algorithm tab. Select the algorithm that the Security Manager will use to sign certificates and revocation lists. The algorithm selected depends on the key type that was selected for the CA.
-
Click the Policy Certificate tab. Enter the number of days until policy certificates should be valid, before they need to be updated (30 days is by default).
-
Click the Next button.
-
If the CA keys should be stored on a device, then:
-
In case that no hardware devices are detected, the No Hardware Device Found dialog box appears. Click OK. The Select New Cryptographic Hardware Library dialog box will appear. Then select the correct cryptographic hardware library for the hardware device.
-
The Use This Hardware dialog box appears. Select the hardware slot that will store the CA keys, see the figure below.
-
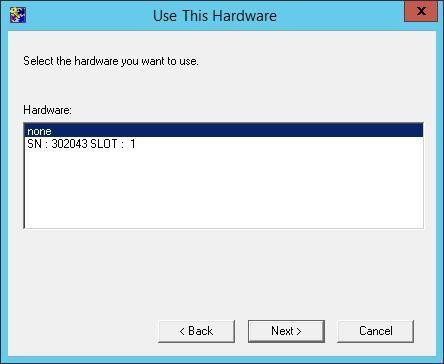
Use This Hardware dialog box
c. Click the Next button.
-
If a root CA or a subordinate CA is being configured, the CRL configuration page appears. If you plan to support Microsoft client applications that use the Microsoft Cryptographic API (such as native Microsoft Outlook clients), it needs to be configured. When configuring a subordinate CA, ensure that the root CA is configured for the same level of Microsoft compatibility.
-
To begin, click on Yes then select one of the following options from the drop-down list:
-
-
To configure CRLs to work with applications on any Microsoft operating system, select Make combined CRLs compatible with applications on any Microsoft OS. When this option is selected, the Security Manager will issue combined CRLs.
-
To configure CRLs to work with applications on Microsoft Windows XP/2003 or later operating systems, select Make partitioned CRLs compatible with applications on Windows XP/2003 or later. When this option is selected, the Security Manager will issue partitioned CRLs.
b. If you do not want the Security Manager to work with Microsoft client applications, click No, do not work with Microsoft Windows applications.
c. To enable the combined CRL, select Enable Combined CRL.
d. Click Next to continue.
-
For a root CA or a subordinate CA, the CRL Distribution Point Information page will appear in case that you selected to work with Microsoft client applications (in that case specify at least one CDP URL). CDP URLs in the Default CDP URLs list are global default CDP URLs. See the figure below.
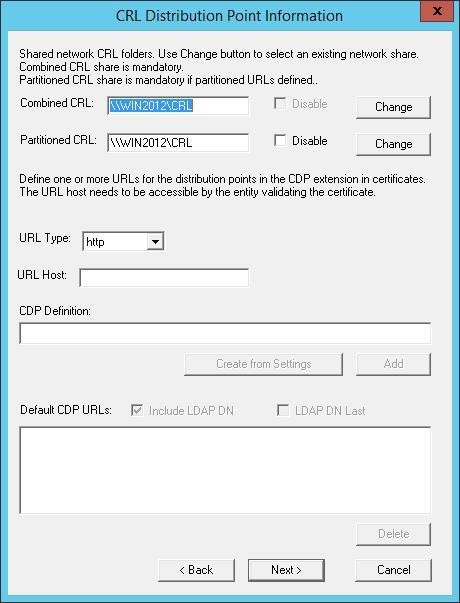
The CRL Distribution Point Information page
a. For Combined CRL:
-
In the text field, enter the path to the folder, where the Security Manager will write combined CRLs. To work with Microsoft client applications, the Security Manager should write combined CRLs to a shared folder on the network. The folder must be named CRL. The account used by the Security manager services should have direct writing privileges for that location.
-
To disable or prevent the Security Manager from writing combined CRLs to files, select Disable (this option is disabled if you chose to configure CRLs to work with applications on any Microsoft OS).
b. For Partitioned CRL:
-
In the text field, enter the path to the folder, where the Security Manager will write partitioned CRLs. To work with Microsoft client applications on modern Windows installations, the Security Manager should write partitioned CRLs to a shared folder on the network. The folder should be named CRL. The account used by the Security manager services should have direct writing privileges for that location.
c. Enter a CDP URL into the CDP Definition field or create a CDP URL from settings as follows:
-
Select a CDP URL type (HTTP, LDAP, file, FTP).
-
In the URL Host field, enter the host name or the IP address of the Web server, FTP server or the File server that will host the CRL files. Click Create from Settings. The CDP Definition field is filled with a CDP URL based on the CDP type and host information provided.
d. To add the CDP URL specified in the CDP Definition field to the Default CDP URLs list, click Add.
e. To remove a CDP URL from the Default CDP URLs list, select the CDP URL that needs to be removed and click Delete.
f. For Default CDP URLs (the global default CDP definitions), you can configure how the LDAP DN is handled in the list of CDPs. The LDAP DN refers to the DN of the CRL in the Security Manager directory.
g. Click Next to continue.
h. If you chose to work with Microsoft client applications, but did not specify any CDP URLs, the following warning appears: To go back, click Cancel. To continue, click OK (if you do not want to add CDP URL).
30. If you are configuring a CSCA, the CRL Distribution Point Information page appears, see the figure below. The CDP URLs in the Default CDP URLs list are global default CDP URLs. CDP URLs in the CSCA CDP URLs list are CDP URLs that will apply to the following CSCAspecific certificate types: CSCA root certificates, CSCA link certificates, Master List Signer certificates and Document Signer certificates.
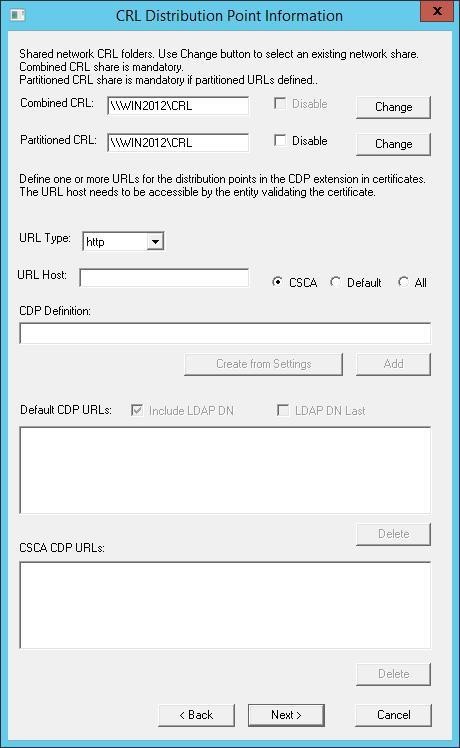
The CRL Distribution Point Information page
a. For Combined CRL:
-
In the text field enter the path to the folder where the Security Manager will write combined CRLs. To work with Microsoft client applications, the Security Manager should write combined CRLs to a shared folder on the network. The folder must be named CRL.
b. For Partitioned CRL:
-
In the text field, enter the path to the folder where the Security Manager will write partitioned CRLs. To work with Microsoft client applications on Windows XP/2003 or later operating systems, the Security Manager should write partitioned CRLs to a shared folder on the network. The folder should be named CRL.
c. Enter a CDP URL into the CDP Definition field or create a CDP URL from settings as follows:
-
From the URL Type drop-down list select a CDP URL type (HTTP, LDAP, file, FTP or https).
-
To add a CDP URL to the Default CDP URLs list, the URL Type should be HTTP, LDAP or https. In case that a CDP URL Is added to the CSCA CDP URLs list.
-
Click Create from Settings. The CDP Definition field is filled with a CDP URL based on the CDP type and host information provided.
d. To add the CDP URL specified in the CDP Definition field to the Default CDP URLs or CSCA CDP URLs list select, which list will contain the CDP URL.
-
To add the CDP URL to the Default CDP URLs list, select CSCA.
-
To add the CDP URL to the CSCA CDP URLs list, select Default.
-
To add the CDP URL to both lists, select All.
e. To remove a CDP URL from the Default CDP URLs list, select the CDP URL that should be removed and click Delete.
f. To remove a CDP URL from the CSCA CDP URLs list, select the CDP URL that should be removed and click Delete.
g. You can configure how LDAP DN is handled in the list of CDPs for the default CDP URLs. The LDAP DN refers to the DN of the CRL in the Security Manager directory.
h. Click on Next to continue.
i. In case that no CDP URLs were specified for a CSCA the following warning appears: "To go back, click on Cancel. To continue, click on OK."
31. If you are configuring a CSCA, the Issuer Alternative Name page appears, see the figure below. CSCA certificates, Master List Signer certificates and Document Signer certificates issued by the CSCA should include an issuer alt name extension (should provide contact information associated with your CSCA and a directory string made of ICAO-assigned country codes). The Security Manager will DER-encode the data and include it in the CSCA root certificates, Master List Signer certificates and Document Signer certificates, issued by the CSCA.
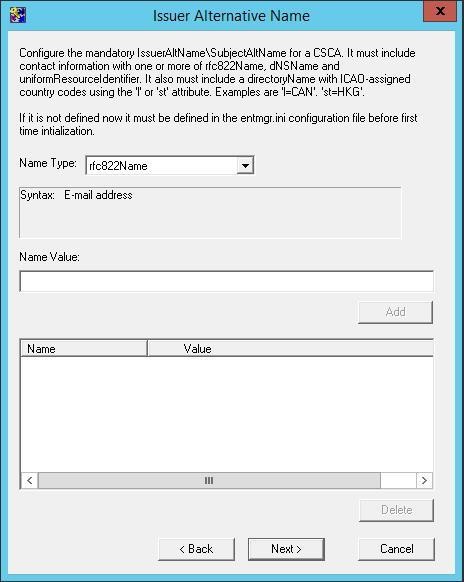
The Issuer Alternative Name page
a. To add value to the IssuerAltName extension, select the type of information to add and enter a value in the Name-Value field. Click OK.
b. To remove a value from the IssuerAltName extension, select the name of the value that should be removed from the list, and click Delete.
c. Click on Next to continue.
d. If no IssuerAltName values were specified, the following warning appears (see the figure below):
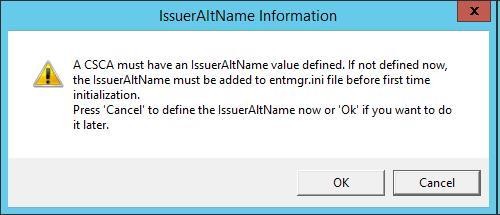
The IssuerAltName information warning
-
The Enable long expiry dates dialog box appears.
-
To allow the CA to issue certificates with expiry dates beyond the end of the year 2037, select Yes.
-
Click on Next to continue.
-
-
If a subordinate CA is being configured, the Subordinate CA Information page appears, see the figure below.
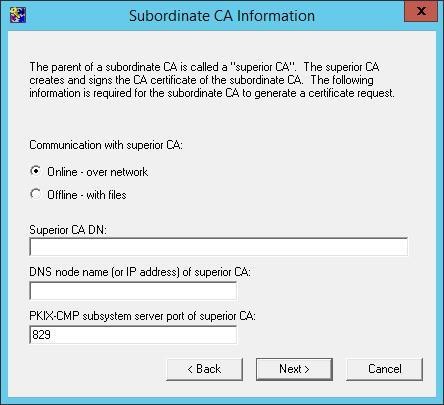
The Subordinate CA information
a. Under the Communication with superior CA, select the method that the subordinate CA will use to request and obtain its initial subordinate CA certificate with its superior CA.
b. If the subordinate CA will communicate online with its superior CA:
-
In the Superior CA DN field, enter the distinguished name of the superior CA. For example, ou=Superior CA,dc=company,dc=com.
-
In the DNS node name (or IP address) of superior CA field, enter the DNS hostname or IP address of the server hosting the superior CA.
-
In the PKIX-CMP subsystem server port of superior CA field, enter the port that the superior CA uses for PKIX-CMP requests.
c. Click on Next.
34. If a subordinate CA is being configured and the subordinate CA will communicate with the superior CA online, the Superior CA Signing Algorithm page appears.
a. Select the signature algorithm that the superior CA will use to sign the subordinate CA verification certificate and then click on Next.
b. Proceed to Step 40.
35. If a root CA or CSCA is being configured, the CA Certificate Properties page appears.
a. In the CA verification certificate lifetime field, enter the lifetime (in months) of the CA’s verification certificate.
b. The CA private key usage period is a percentage of the CA verification certificate lifetime. For example, 33 % of 180 months is 60 months (5 years). When the private key reaches near the end of its lifetime, the Security Manager starts writing messages to the audit logs, informing you that the CA is nearing expiry.
c. Click on Next to continue.
36. If the CVCA license information was entered, the Configuration Information for CVCA page appears, see the figure below.
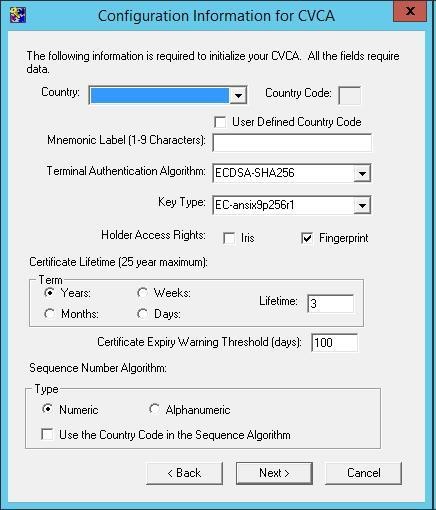
The Configuration information for CVCA page
a. In the Country drop-down list, select your country.
b. In the Mnemonic Label field, enter a unique label for the CVCA.
c. In the Terminal Authentication Algorithm drop-down list, select a terminal authentication algorithm.
d. In the Key Type drop-down list, select a key type.
e. The holder access rights can be allowed, if necessary.
f. Under the Certificate Lifetime, enter the lifetime of CVCA certificates.
g. In the Certificate Expiry Warning Threshold (days) field, enter the number of days before a CVCA certificate expires, until the Security Manager starts warning you of the impending expiry. A value of 0 suppresses the warnings.
h. Under the Sequence Number Algorithm.
-
Click on Numeric to use a numeric sequence number algorithm.
-
Click on Alphanumeric to use an alphanumeric sequence number algorithm.
i. To include the country code in the sequence number algorithm, select Use the Country Code in the Sequence Number Algorithm.
j. Click on Next to continue.
-
If the DV license information was entered, the Configuration Information for DV page appears.
-
In the Country drop-down list, select your country.
-
In the Mnemonic Label field, enter a unique label for the DV.
-
Click on Next to continue.
-
-
If the folders that were specified for the combined or partitioned CRLs exist, a Remove Duplicate Share dialog box appears. This dialog box warns you that if you continue, the wizard will delete the current shared folder and create a new shared folder.
-
When the configuration wizard creates a shared CRL folder, the CRL Share dialog box appears. The CRL folder was created and granted the appropriate permissions to the Administrators' group on the server.
-
For domain users to access the CRL file in the folder, read permission for the CRL folder has to be granted to the Domain Users group. If a Web-based CDP is used, the CRL folder must be added (shared to the Web) to the default Web site with the alias CRL.
-
Click on OK.
-
-
The Configuration Complete page appears. See the figure below.
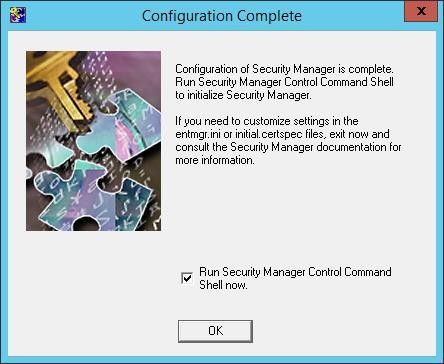
The Configuration Complete page
-
To initialize the Security Manager immediately, select Run Security Manager Control Command Shell now. If you want to do that later and customize some of the Security Manager files, then click don't select that option.
-
Clicking on OK will close the Security Manager configuration wizard.
-
If you chose to initialize Security Manager later, the Configuration Incomplete dialog box appears. Click on OK to close it.
After configuring the Security Manager either securely destroy the copies of the collected configuration data and the entconfig.ini file, or lock them in a safe place, because they contain sensitive information.
It is not possible to configure the Security Manager again. If you made a mistake, you can change some of the settings by editing the entmgr.ini file, or by uninstalling or reinstalling the Security Manager and then configuring it again.
More information about this topic can be found in [SMII], [SMOI] and [SMDI].