
Skip this section if your ESKM system will not be communicating with KMIP-enabled
clients.
The KMIP server provides the interface to clients that use the KMIP protocol. Transport Layer Security (TLS) is required; therefore, you must specify the name of
the server certificate.
To configure the KMIP server, perform the following steps:
-
Select the Device tab.
-
In the Device Configuration menu, click KMIP Server to display the KMIP Server Configuration window.
-
In the KMIP Server Settings section of the window, click Edit.
-
Configure the KMIP Server Settings. The IP address can be an IPv4 address or an IPv6 address. If support for IPv6 has been enabled, see First run. If necessary, change the Port and Connection Timeout values. Utimaco recommends the default values of 5696 for the Port and 3600 for the Connection Timeout. For Server Certificate, select the name of the certificate you created in Setting up ESKM certificate. For example, ESKM KMIP Server.
If your ESKM server is operating in FIPS-compliant mode, you must specify a KMIP server certificate that complies with the FIPS requirements.
If your ESKM servers are in a cluster and you are selecting a new KMIP server certificate from the “Server Certificate:” field, you must make sure that all of the ESKM servers in the cluster already have a KMIP server certificate installed with this same name.
If your ESKM server will support the KMIP Certify or Re-certify operations, you must specify the name of a Local CA that will be used to create the certificate. In addition, you must set the KMIP user group permissions for these operations to be enabled. For more information on setting KMIP user group permissions, see the KMIP Permission model description, which is located in section 3 of the Enterprise Secure Key Manager User Guide.
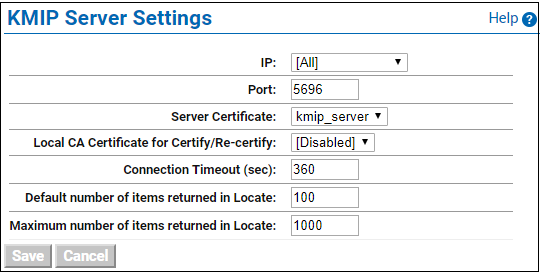
KMIP Server Settings
-
Click Save.
Changing the KMIP server setting causes the KMIP server to restart.
-
Confirm that the KMIP server is started.
-
Go to the Services List section of the Services Configuration page
(Device -> Maintenance -> Services -> KMIP Server). -
The status of the KMIP server should be Started. If the status is Stopped, select the KMIP Server, and then click Start.
-
During the execution of the Setup utility, a default KMIP Server Certificate is automatically created. This certificate should only be used for testing purposes, as it is a self-signed certificate. If your ESKM system will be communicating with KMIP-enabled clients, Utimaco highly recommends that you create a new KMIP server certificate. The name you assign to these server certificates should clearly indicate their purpose. For example: ESKM KMS Server and ESKM KMIP Server.
KMIP requires mutual authentication. After configuring the KMIP server, enable KMIP client certificate authentication. The KMIP client certificate authentication status is disabled by default.
To enable KMIP client certificate, perform the following steps.
-
In the KMIP Server Authentication Settings section of the window, click Edit.
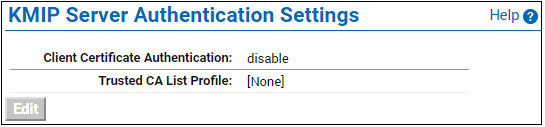
KMIP Server Authentication Settings
-
Click enable, select the appropriate Trusted CA list, and click Save.

KMIP Server Authentication Settings - Enable Authentication