

This section explains how to install an Entrust Authority Security Manager PostgreSQL Database on the supported operating systems. The Security Manager PostgreSQL Database is an Entrust-supplied database of the Security Manager. It stores information about the Security Manager infrastructure, X.509 users and EAC entities.
To improve the security, reliability and performance, it is recommended that the Security Manager PostgreSQL Database is installed on a server that is separated from the server hosting your directory.
The drive file system, where the database will be installed, should be configured as an NTFS file system. Also, do not use remote software to install the database.
Example dialog boxes and file paths may differ from software version to software version.
When installing the Security Manager PostgreSQL Database, make sure to record all usernames and passwords that are used to install it (they will be needed, when installing the Security Manager software).
To install the Security Manager PostgreSQL Database on Microsoft Windows, follow the steps below.
-
Disable any anti-virus software to prevent any conflicts during the installation process.
-
Log in to Entrust TrustedCare with the credentials supplied by the Entrust sales representative.
-
Browse to the Security Manager 10.0 software downloads page. PKI -> Authority -> Security Manager.
-
Download the Security Manager PostgreSQL Database installer ZIP package: PostgreSQL 11.7 (64-bit) Full and Upgrade Installer - Windows.
-
Extract the installer ZIP package to a temporary location.
-
Navigate to the extracted folder.
-
Run the installer:
SM_PostgreSQL_11_7_Win_setup.exe. -
Log in to the Windows server that will host the Security Manager PostgreSQL Database and Security Manager.
-
If you are using Microsoft Active Directory Domain Services (AD DS), log in with a domain administrator account (the account must be a member of the Domain Admins group in the Active Directory - the Entrust Configuration Wizard for the Microsoft Active Directory account) can be used.
-
If you are using other directories, log in with a user account that is a member of the local administrator’s group.
-
Close any open applications.
-
Run the installer to begin the Security Manager PostgreSQL Database installation.
-
The installer checks the operating system for the required software.
-
A list of the required software that is not found will be displayed.
-
Click on Install to install the required software.
-
-
The InstallShield Wizard appears. Click on Next to continue.
-
The License Agreement page appears.
-
Read the license agreement carefully.
-
If you accept all the terms of the license agreement, click on Yes to continue.
-
-
The Choose Destination Location page appears.
-
Use the default installation folder or change it by clicking on the Browse button (do not select a mapped network drive).
-
Click on Next to continue.
-
-
The Select Drive for Database page appears.
-
Select the drive where you want to store the PostgreSQL data (requires at least 1.5 GB of free space).
-
Click on Next to continue.
-
-
The Database Write-ahead Log Drive page appears.
-
Select the drive, where the PostgreSQL Write Ahead Log (WAL) files will be stored (requires at least 1 GB of free space).
-
Click on Next to continue.
-
-
The Possible Data Security Issue dialog box appears in case you choose to store the PostgreSQL WAL files and PostgreSQL data on the same drive. Click on Yes if you want to go back and change the information or click on No to proceed.
-
The PostgreSQL Windows (R) Account Password page appears. The installer will create a Windows user account for PostgreSQL called "easm_entrust_pg" that will own the Security Manager PostgreSQL database and database processes. See the figure below.
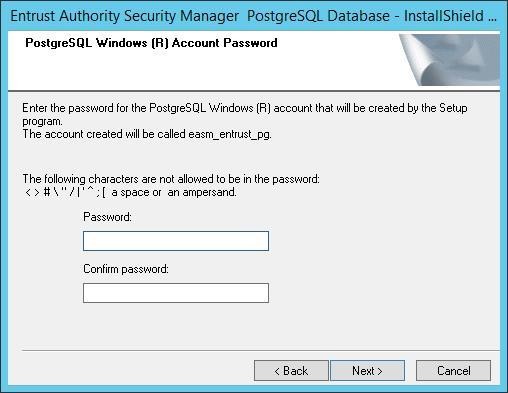
PostgreSQL Windows (R) Account Password page
a. Enter a strong password.
A strong password should contain at least 8 characters, at least one uppercase character, one lowercase character, one number and one non-alphanumeric character.
b. Click on Next to continue.
-
Repeat the above process for users in the PostgreSQL called "easm_entrust" and "easm_entbackup".
-
The Password for Database User page appears. The installer will create a user in the PostgreSQL called "easm_entrust" that will own the Security Manager schema and data in the database.
-
Enter a strong password.
-
Click on Next to continue.
-
-
The Password for Database Backup User page appears. The installer will create a user in the PostgreSQL called easm_entbackup that is required to back up and restore the Security Manager data.
-
Enter a strong password.
-
Click Next to continue
-
-
The PostgreSQL Database Port page appears. By default, the PostgreSQL uses port 5432 (otherwise use one between 1000 and 65535).
-
Click on Next to continue.
-
The Check Setup Information page appears. See the figure below.
-
Review the PostgreSQL install settings and go back if anything needs to be changed.
-
Record the locations of the PostgreSQL data directory and PostgreSQL WAL files directory (by default
C:\easm_entrust_pg_data_11andC:\easm_entrust_pg_wal_11). If anti-virus software is installed, these directories ought to be excluded from the antivirus scans. -
Click on Next to install PostgreSQL.
-
Find the log file postgres-11.7-install.log in C:\Users\<user>\AppData\Local\Temp to investigate any errors that might encountered during installation.
-
The Setup Status page with progress bar appears. After PostgreSQL is installed, the InstallShield Wizard Complete page appears.
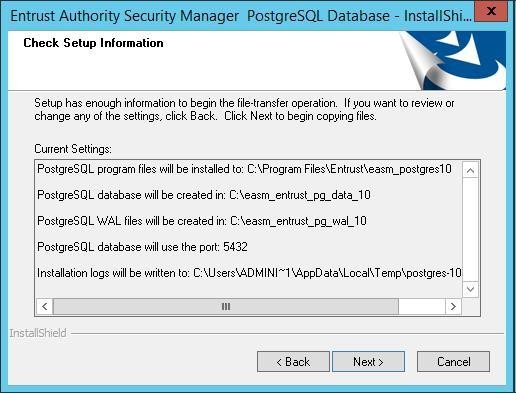
The Check Setup Information page
-
Click Finish.