
This section describes how to create certificate templates when the private key is managed using an HSM. All subscribers who enroll for a certificate based on such a template must have a client connection to the HSM.
If a CA installed on Windows Server Core is managed remotely, the snap-ins in this section must run on a separate machine with GUI capabilities.
To integrate the CA certificate enrollment functionality with a CA private key generated by the Utimaco HSM:
-
Create a CA template that uses the Utimaco HSM
a) Open Command prompt and run the certtmpl.msc command
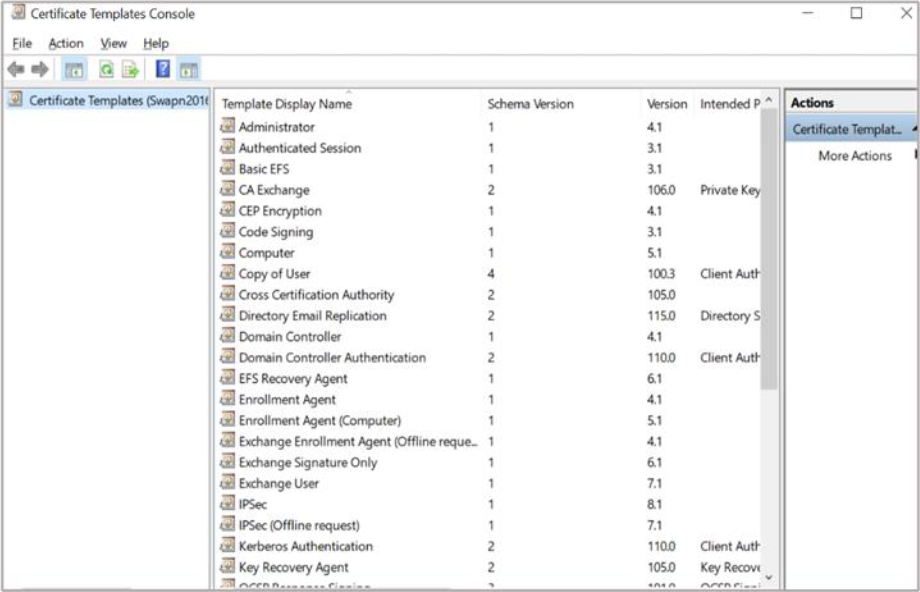
Figure 33: Certificate Template Console window
b) Right-click the Administrator template, then select Duplicate Template. The Properties window opens, showing Compatibility tab
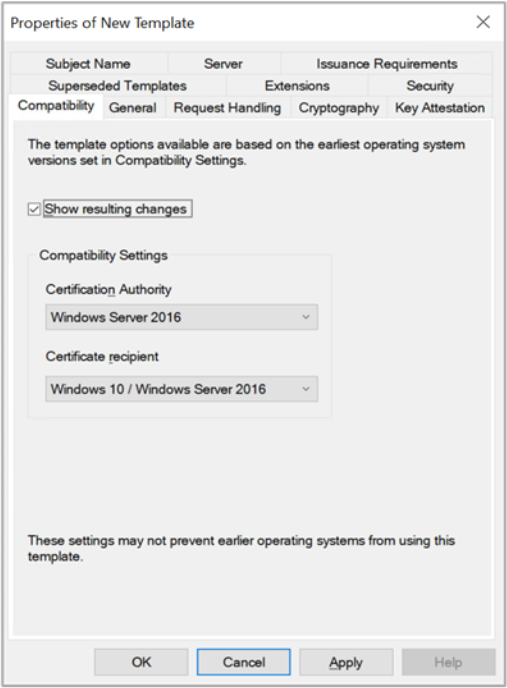
Figure 34: Compatibility Tab window
c) Select appropriate windows version under Certificate Authority and Certificate Recipient drop-down box
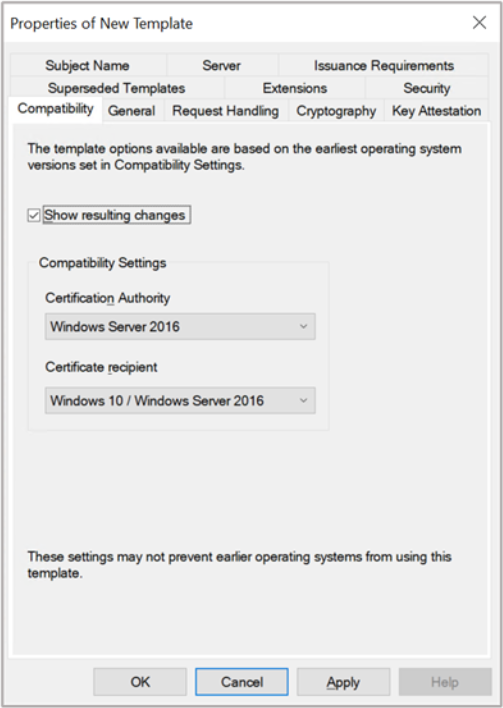
Figure 35: Compatibility Tab window
d) Select the General tab. In Template display name, type a name for the template
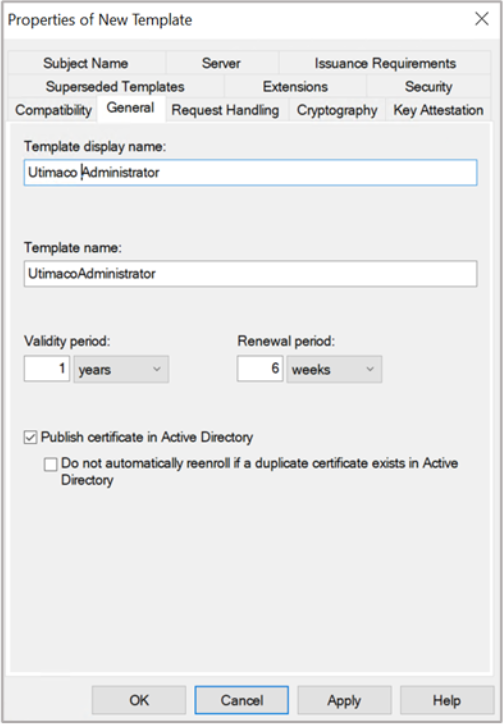
Figure 36: General Tab window
e) Select the Request Handling tab, and in Purpose select Signature and deselect Allow private key to be exported
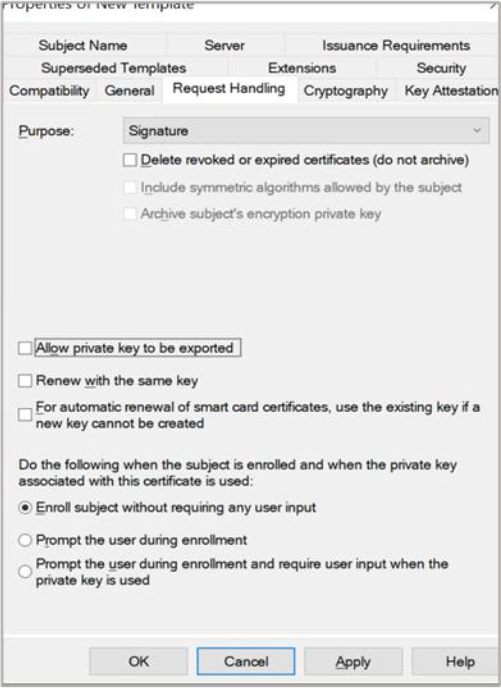
Figure 37: Request Handling Tab window
If you are using Smartcard Authentication, the prompt will go on the PIN Pad device to insert Smartcard and enter the pin. Then press OK button on the PIN Pad.
f) Select the Cryptography tab and in the Provider, category select Key storage provider
g) In Algorithm Name, select the algorithm from the list
h) Click on the radio button for Requests must use one of the following providers and in Providers, select Utimaco CryptoServer Key Storage Provider only
If CA is on Windows Server Core and you are managing it remotely using certtmpl.msc on a
different PC, you need to install the Utimaco CryptoServer Key Storage Provider on the PC
that is running certtmpl.msc. Otherwise, the Utimaco CryptoServer provider will not appear.
i) In Request Hash, select a hash type
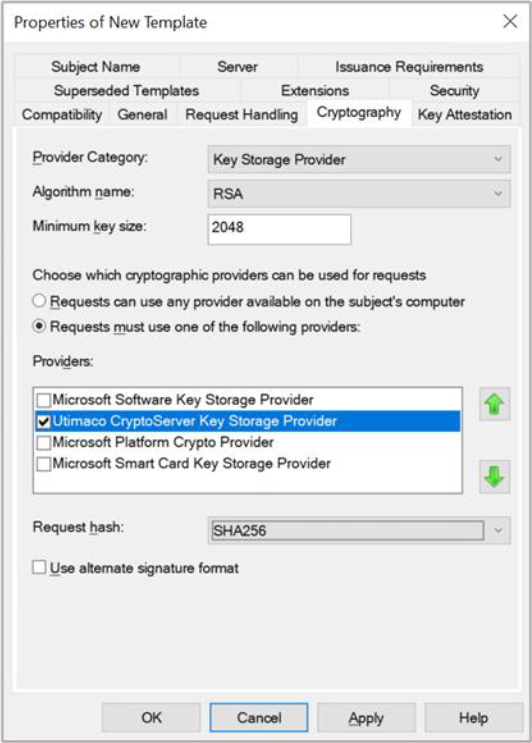
Figure 38: Cryptography Tab window
j) Select Subject Name tab and deselect Include e-mail name in subject name and deselect E-mail name
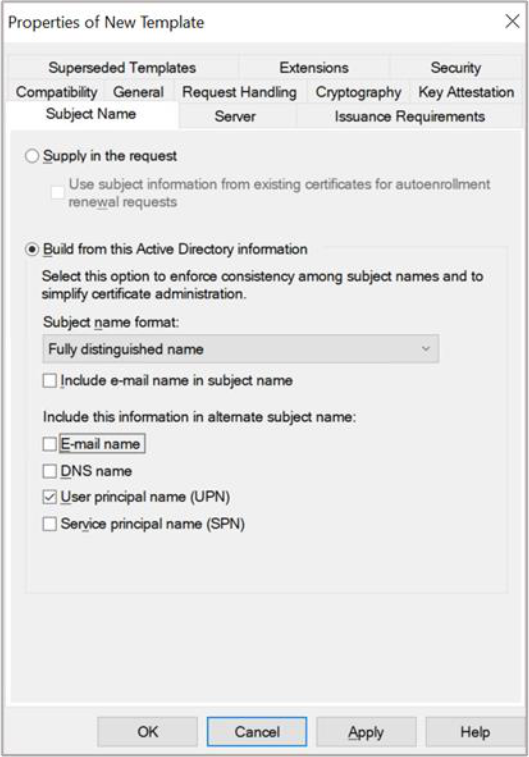
Figure 39: Subject Name Tab window
k) Select Apply and OK to save the template settings and close the Certificate Template console
-
Open Command prompt and run the certsrv.msc command
Windows Server Core: If a CA is configured on Windows Server Core and is managed via the Microsoft Management Console (MMC) from a different machine, you might get an error which states: Cannot manage Active Directory Certificate Services. To fix this, select OK, then in the certsrv.msc~ console that appears, select Action click on Retarget Certification Authority. In the window that appears, select Another Computer, then select Browse to find the CA you want to manage.
Windows Server Core: Sometimes an error appears indicating that the RPC server is unavailable. To fix this, sign into the Windows Server Core machine and minimize the command prompt. A window prompts you to load a key. Complete the steps in the window and attempt to select the CA again from certsrv.msc.
-
In the left-hand pane, select the Certificate Authority name
-
Right-click the Certificate Template node, then select New then select Certificate
Template to Issue
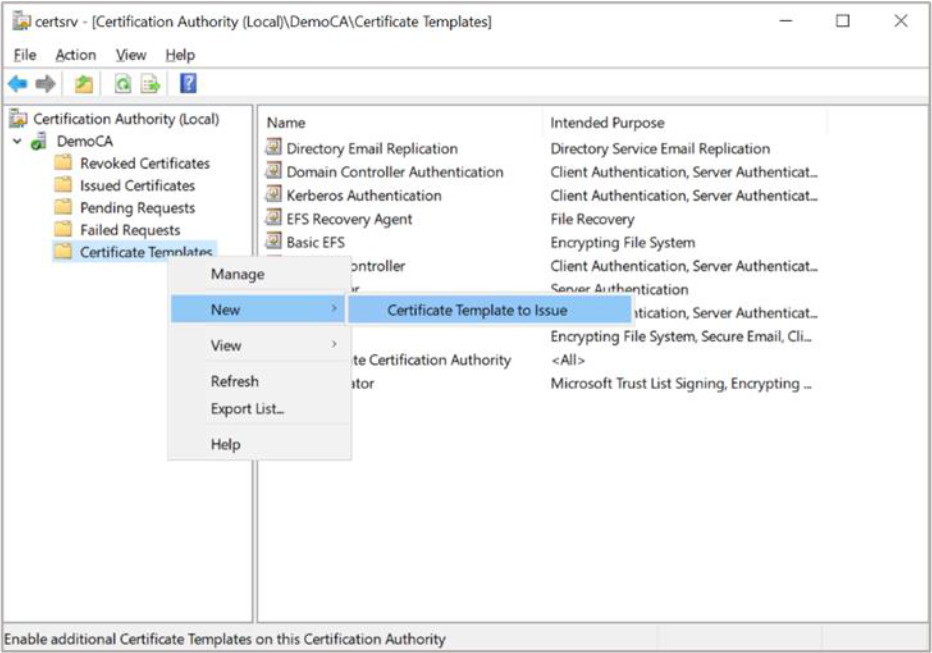
Figure 40: Certificate Templates Tab window
-
Select the template you just created, then click OK
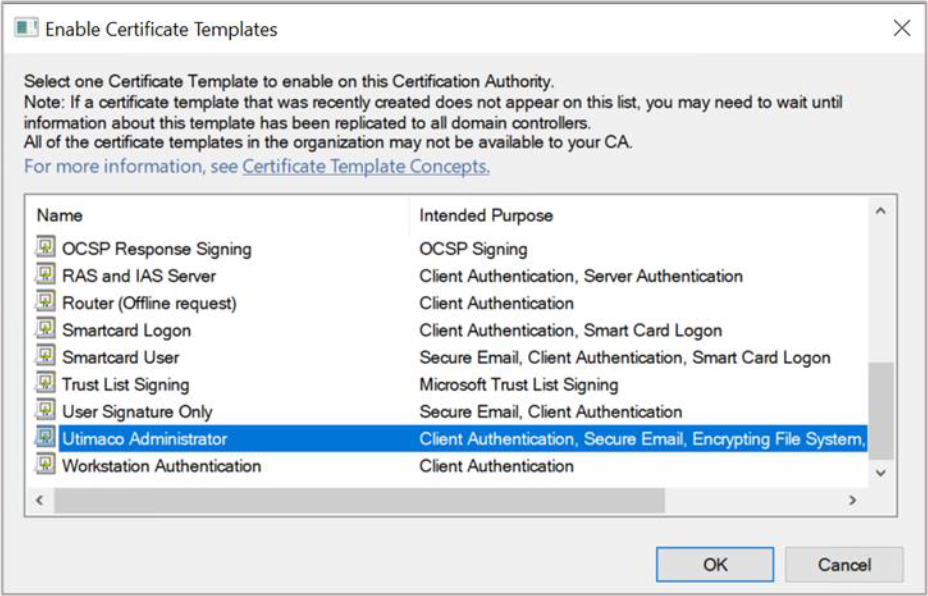
Figure 41: Enable Certificate Templates window
-
Request a certificate based on the template:
a) Open the command prompt and run the certmgr.msc command
b) In the left-hand pane, right-click the Personal node, then select All Tasks select Request New Certificate
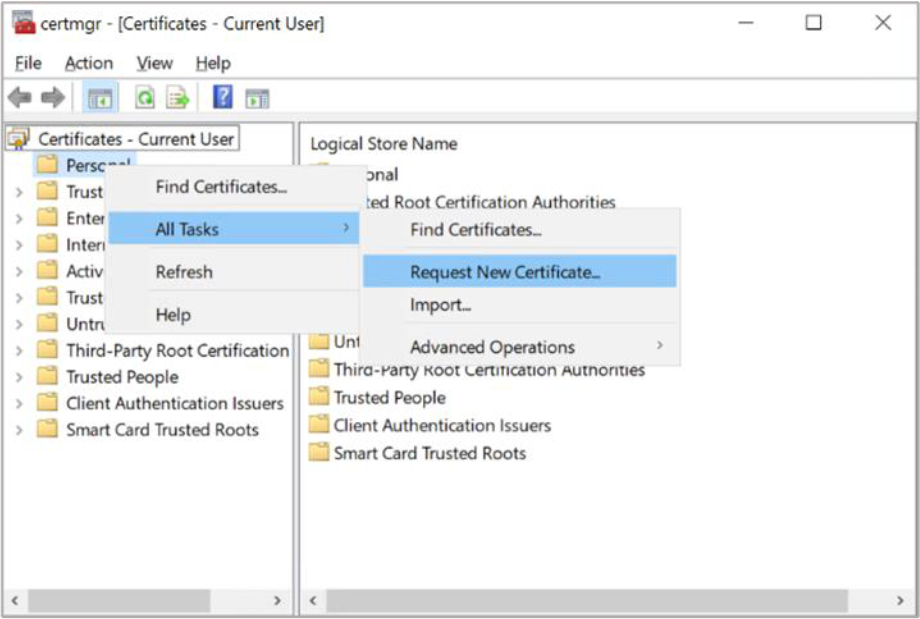
Figure 42: Certificate Manager window
c) Select Next in the first two windows
If you are using Smartcard Authentication, the prompt will go on the PIN Pad device to insert Smartcard and enter the pin. Then press OK button on the PIN Pad.
d) Select template that you created, then Click Enroll
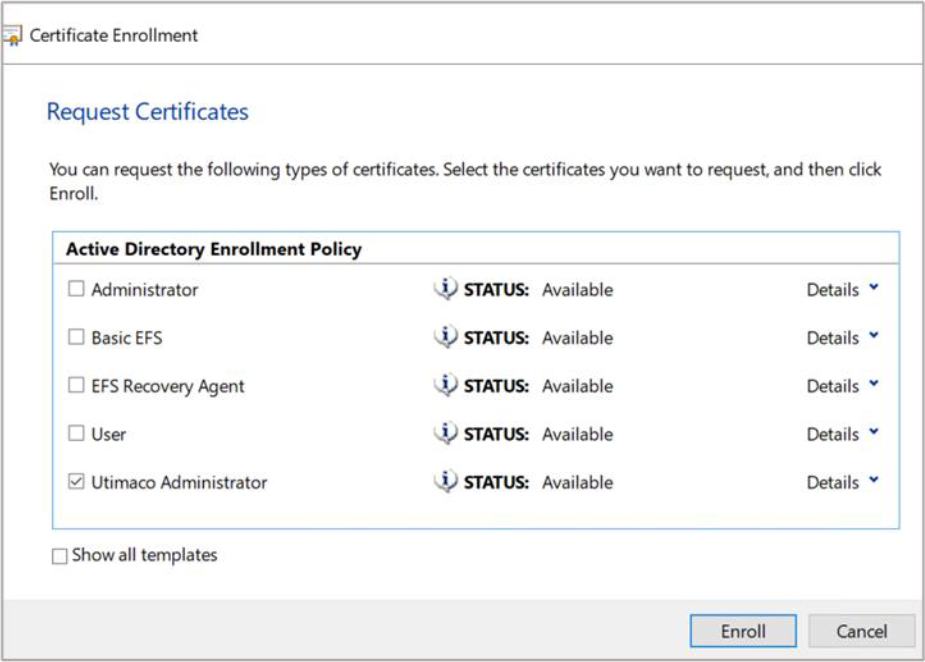
Figure 43: Certificate Enrollment window
e) The Certificate Installation Results window should show STATUS: Succeeded. Select Finish
-
Verify that the certificate is enrolled successfully. If the certificate fails to enroll because the CA is not started or the RPC ports are blocked, the following error is displayed:
Error: the RPC server is unavailable. 0x800706ba (win32: 1722 RPC_S_SERVER_UNAVAILABLE
The enrollment wizard shows if the certificate enrollment was successful or failed.
Use Details to check the main information.