
ESKM server certificates are used by the client to authenticate the ESKM server during the TLS/SSL handshake. ESKM supports two types of clients. Clients that use the ESKM protocol are referred to as ESKM clients. Clients that use the KMIP protocol are referred to as KMIPenabled clients. The ESKM clients communicate with the KMS server and KMIP-enabled clients communicate with the KMIP server.
During the execution of the Setup utility a default KMIP Server Certificate is automatically created. This certificate should only be used for testing purposes, as it is a self-signed certificate. If your ESKM system will be communicating with KMIP-enabled clients, Utimaco highly recommends that you create a new KMIP server certificate. The name you assign to these server certificates should clearly indicate their purpose. For example: ESKM KMS Server and ESKM KMIP Server.
KMIP requires mutual authentication. After configuring the KMIP server, enable KMIP client certificate authentication. The KMIP client certificate authentication status is disabled by default.
If you will be using a third-party CA, and wish to use an existing server certificate, see Import a third-party server certificate.
To create an ESKM server certificate, perform the following steps:
-
Click the Security tab.
-
In Certificates and CAs, select Certificates.
-
Enter information required by the Create Certificate Request section of the window to create the ESKM server certificate.
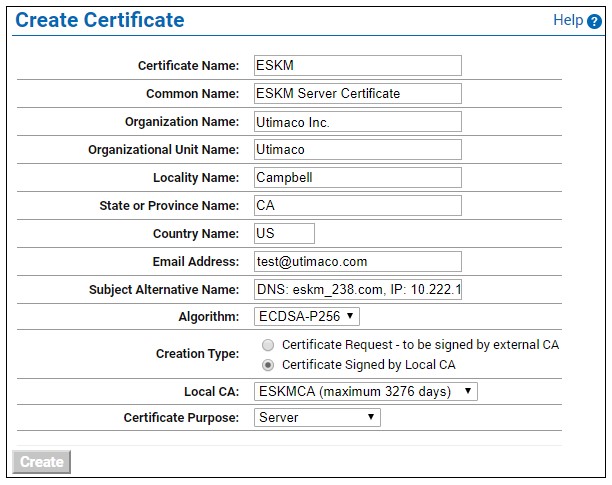
Create Certificate window
a) Enter a Certificate Name and Common Name, for example ESKM KMS Server.
b) Enter your Organizational information.
c) Enter/Select the Subject Alternative Name, Algorithm, Creation Type, Local CA, and Certificate Purpose. Utimaco recommends using an algorithm with security strength of at least 128 bits (e.g., ECDSA-P256).
-
Click Create.
-
The Certificate List will include the newly created certificate, its status will be Request Pending. Click on the certificate name. For example, ESKM KMS Server.
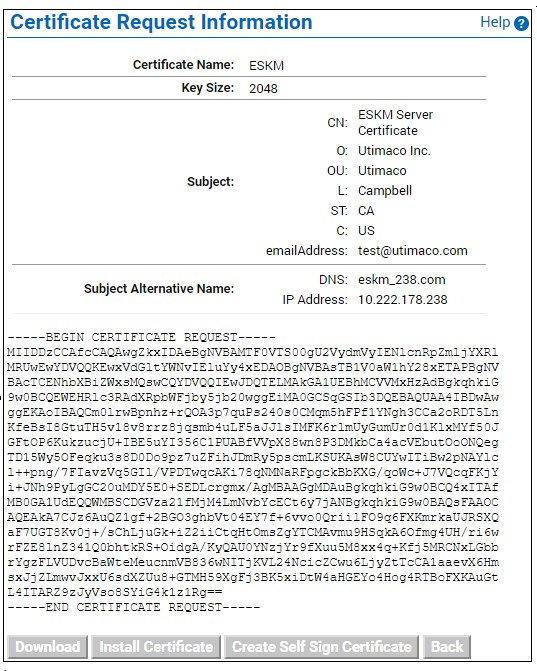
Certificate Request Information window
Key Size refers to the size of the key or elliptic curve associated with this certificate.
-
In the Certificates & CAs menu, click Local Cas.
-
Click on the CA name you created in Setting up local CA for example ESKM Local CA.
-
Click Sign Request.
-
Enter data required by the Sign Certificate Request section of the window.
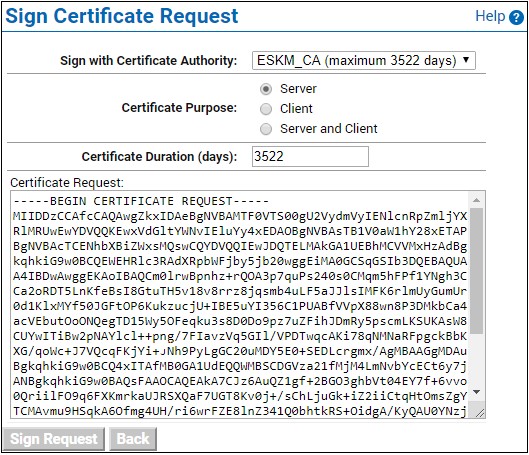
Sign Certificate Request window
a) Select the CA name from the Sign with Certificate Authority drop down box. For example, ESKM Local CA.
b) Select Server as the Certificate Purpose.
c) Enter the number of days before the certificate must be renewed based on your site’s security policies. The default value is 3649 days (10 years).
-
Click Sign Request.
-
In the Certificates & CAs menu, click on Certificates.
-
Click on the certificate name created in step 3 of this section. For example, ESKM KMS Server.
-
Click Install Certificate.
-
Paste the signed certificate data from step 12, and then click Save. Note that the Certificate status is now Active.
Repeat all of the steps above for the KMIP server certificate. You must perform these steps on each ESKM server after joining the cluster.
The “certificate name” must remain same on all ESKM servers across the cluster.