Sign and Time-stamp the Executable

There are different ways to access the code-signing certificate using Signtool.

  • The preferred method to do this is directly from the certificate stored with the thumbprint.

  • The second method is by using the key name

  • The third method is by pointing to a .cer file that was created by exporting the certificate.

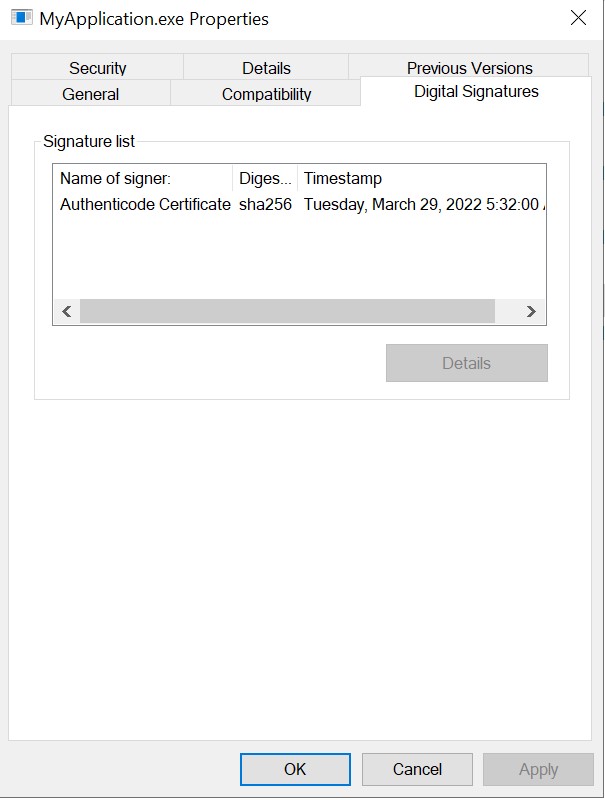
In this guide an executable file called MyApplication.exe was created, signed, and timestamped.

1. Create a PowerShell script file with name Sign_Timestamp_Executable.ps1 and add the following content into the script file.

Sign_Timestamp_Executable.ps1

#The first method using the certificate hash value

#Get the certHash Value from Step 3 in section 5.3

$certHash = "1974f986d9b8bf32f47fc2af33d6271dd905c44f"


#The second method is name of the key

#Key name generated in section 5.2

#$ContainerName = "Authenticode_TestKey"


#The third method is by using an exported certificate path

#Self Signed Certificate name generated in section 5.3

#$SelfCertName = "Authenticode Certificate"

#$SelfSignedCertificatePath = "C:\Authenticode\Authenticode

Certificate.cer"


# Certificate Services Time Stamp Server

$timestampServer = "http://timestamp.digicert.com”


# File to be Signed

$fileName = "C:\Authenticode\MyApplication.exe" signtool sign /debug /tr $timestampServer /td sha256 /fd sha256 /a $fileName

  1. Launch PowerShell as Administrator and run Sign_Timestamp_Executable.ps1. Enter the passphrase when prompted.

›_ PowerShell

> .\Sign_Timestamp_Executable.ps1

The following certificates were considered:

Issued to: Authenticode Certificate

Issued by: Authenticode Certificate

Expires: Fri Mar 17 09:57:01 2023

SHA1 hash: 1974f986d9b8bf32f47fc2af33d6271dd905c44f

After EKU filter, 1 certs were left.

After expiry filter, 1 certs were left.

After Subject Name filter, 1 certs were left. After Private Key filter, 1 certs were left. The following certificate was selected:

Issued to: Authenticode Certificate

Issued by: Authenticode Certificate

Expires: Fri Mar 17 09:57:01 2023

SHA1 hash: 1974f986d9b8bf32f47fc2af33d6271dd905c44f

Done Adding Additional Store

Successfully signed: C:\Authenticode\MyApplication.exe

Number of files successfully Signed: 1

Number of warnings: 0

Number of errors: 0

If you are using Smartcard Authentication, the prompt will go on the PIN Pad device to insert Smartcard and enter the pin. Then press OK button on the PIN Pad.

  1. You can verify that your application is now signed by right clicking on it and selecting Properties. On the Digital Signatures tab (if it exists), you can view the signing certificate and timestamp.

tmpzibzci7n.jpg

Digital signature details