
To setup ESKM servers to the cluster, perform the following steps in the Join Cluster section on each additional ESKM server.
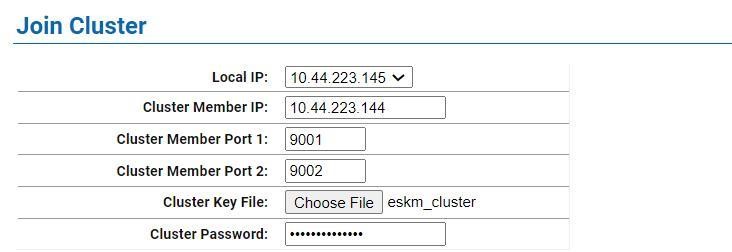
Join Cluster window
Adding multiple ESKM servers to the cluster is a serial process. Add the first ESKM server and then monitor the system log for the status of the synchronization process. Wait until the “Cluster synchronization succeeded.” message appears in the system log before attempting to add the next ESKM server to the cluster. The amount of time required to complete the synchronization process is a function of the number of keys in the cluster.
If the new ESKM server is a replacement and is configured with the same IP address as the failed ESKM server, make sure the client does not send any key generation requests until the new ESKM server has successfully completed the cluster synchronization process.
Alternately, you can stop the KMS and KMIP servers and then start them once the cluster synchronization process is complete. Use the system log to monitor the progress of the cluster synchronization process.
-
Join the ESKM server to the cluster.
-
Select the Device tab.
-
In the Device Configuration menu, click on Cluster.
-
In the Join Cluster section of the window, select the appropriate Local IP value and then input the appropriate value for the Local Port.
-
All ESKM servers in a cluster must use an IPv4 address for the cluster.
d. Type the original cluster member’s IP into Cluster Member IP.
e. Type the original cluster member’s port into Cluster Member Port. The default value of this port is 9001. If this value was changed in while creating the cluster, use that value.
f. Click Browse and select the Cluster Key File you saved in while creating the cluster.
g. Type the cluster password into Cluster Password.
h. Click Join.
i. Click Confirm to synchronize with the cluster.
If the ESKM server joining the cluster is SSL enabled, this step will cause the WebAdmin service and the KMS and KMIP servers to restart, resulting in a temporary connection loss.
To restore the connection, refresh the browser.
-
After adding all members to the cluster, you can then delete the cluster key file from the desktop.
-
After clustering the ESKM servers, follow the steps in Setting up ESKM certificate to create and install the server certificates on each ESKM server that has joined the cluster. Depending on the KMS and KMIP configuration, two server certificates may need to be created for each ESKM server in the cluster. Be sure to use the same server certificate name as specified under KMS Server Settings and KMIP Server Settings.
-
After creating the KMIP server certificate you must manually restart the KMIP server. Go to the Services List section of the Services Configuration page (Device -> Maintenance -> Services -> KMIP Server).
-
Go to the Services List section (Device > Services) and start the KMIP server.