

Downloading and Installing Utimaco Software
If you have not already done so, please create and request a Utimaco Support Portal Account.
This will allow you to download the software components needed for this installation.
-
Copy the downloaded software to the appropriate location on the Cloudflare Keyless SSL Server.
-
Create the required directories under
/opt/utimaco.
sudo mkdir -p /opt/utimaco/bin
sudo mkdir -p /opt/utimaco/lib
-
Copy the PKCS#11 library (
libcs_pkcs11_R3.so) to the library directory.
sudo cp ~/path_to_application_folder/lib/libcs_pkcs11_R3.so /opt/utimaco/lib/
-
Copy the required Utimaco utilities (
csadmandp11tool2) to the binary directory.
cd ~/path_to_application_folder
sudo cp csadm p11tool2 /opt/utimaco/bin/
-
Make the binaries executable.
sudo chmod +x /opt/utimaco/bin/csadm /opt/utimaco/bin/p11tool2
u.trust GP HSM PKCS#11 Configuration
-
Create a directory to store the PKCS#11 configuration file.
sudo mkdir -p /opt/utimaco/PKCS11_R3
-
Navigate to the PKCS#11 sample configuration directory in the Utimaco software package and copy the configuration file.
cd <install_directory>/Software/Linux/x86-64/Crypto_APIS/PKCS11_R3/sample
sudo cp cs_pkcs11_R3.cfg /opt/utimaco/PKCS11_R3/
-
Move to the configuration directory.
cd /opt/utimaco/PKCS11_R3
-
Update the PKCS#11 configuration fileEdit the configuration file.
sudo vi /opt/utimaco/PKCS11_R3/cs_pkcs11_R3.cfg
Update the configuration as shown below.
[Global]
# For unix:
Logpath = /tmp
# Loglevel (0 = NONE; 1 = ERROR; 2 = WARNING; 3 = INFO; 4 = TRACE)
Logging = 1
Keepalive = true
# Set the Device to connect with
[CryptoServer]
# Device specifier
Device = <HSM_IP>
-
Set proper permissions (required for GoKeyless).
sudo chown -R gokeyless:gokeyless /opt/utimaco/PKCS11_R3
-
Run the following command to validate HSM connectivity and PKCS#11 configuration.
./p11tool2 ListSlots
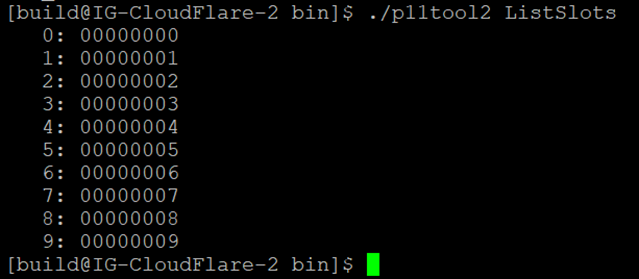
Listing available HSM slots with p11tool2
For more information regarding the commands and command parameters, please
check the u.trust GP HSM documentation. The device may be a u.trust GP HSM
(PCIe or LAN) device.
The device line will follow one of these patterns, based on the HSM form-factor:
Device = 288@<HSM IP address> Hardware (LAN) HSM
OR
Device = /dev/cs2.0 Hardware (PCIe) HSM
To make your testing easier, you can enable the PKCS#11 log file.
That can be enabled by editing the Logging Loglevel. Set the LogPath and Logging
Loglevel to 1. For testing you may want to increase it to 4.
The added LogPath points to a writable directory, not to a file.
If you encounter problems, check the log file named cs_pkcs11_R3.log in the
LogPath defined directory. When you are done testing, you should change Logging
to 1 or 2. This will limit the logging to only critical and important messages.
u.trust GP HSM Simulator Setup and Initialization
This section describes how to set up and start the u.trust GP HSM Simulator on the Keyless server for testing purposes.
-
Copy the simulator package (sim5_linux) to the designated directory on the server.
sudo mkdir -p /opt/utimaco/Simulator
sudo cp -r <path_to_sim5_linux> /opt/utimaco/Simulator/
-
Assign execution permissions to the simulator binaries.
cd /opt/utimaco/Simulator/sim5_linux
sudo chmod +x *
-
Install the required 32-bit libraries (if not already installed).
sudo dnf update -y
sudo dnf install glibc.i686 libstdc++.i686 zlib.i686 -y
-
Verify required system library.
ls /lib/ld-linux.so.2
The file path should be displayed. If not, install missing dependencies.
-
Navigate to the simulator directory and start the simulator.
cd /opt/utimaco/Simulator/sim5_linux
./bl_sim5 -h -o -d ../devices

Utimaco HSM simulator successfully started
The simulator setup described in this guide is optional and intended for lab and testing purposes only.
For production deployments, it is recommended to use a physical u.trust GP HSM, as it provides the required security, performance, and compliance characteristics expected in a production environment.
Create SO User and Initialize a Slot
This section describes how to create Security Officer (SO) and User accounts, initialize a slot, and update default credentials on the u.trust GP HSM Simulator.
Prerequisites:
-
the HSM Simulator is running and accessible (e.g.,
127.0.0.1). -
the
csadmutility is available in the current directory or PATH. -
the admin key file (e.g.,
ADMIN_SIM.key) is available.
Steps:
-
Create a user assigned to the slot.
./csadm dev=3001@127.0.0.1 LogonSign=ADMIN,./ADMIN_SIM.key AddUser=USR_0000,00000022{CXI_GROUP=SLOT_0000},hmacpwd,87654321
-
Create the SO user for slot management.
./csadm dev=3001@127.0.0.1 LogonSign=ADMIN,./ADMIN_SIM.key AddUser=SO_0000,00000200{CXI_GROUP=SLOT_0000},hmacpwd,87654321
-
Change the default password for the SO user.
./csadm dev=3001@127.0.0.1 Logonpass=SO_0000,87654321 ChangeUser=SO_0000,Cloud123
-
Change the default password for the user.
./csadm dev=3001@127.0.0.1 Logonpass=USR_0000,87654321 ChangeUser=USR_0000,Cloud123
-
List all users to confirm successful creation.
./csadm dev=3001@127.0.0.1 LogonSign=ADMIN,./ADMIN_SIM.key ListUsers

Utimaco HSM user configuration details
-
Replace
127.0.0.1with the actual HSM IP address if using a remote device. -
Replace passwords (
87654321,Cloud123) with secure values as per policy. -
Ensure the slot name (
SLOT_0000) matches your configuration. -
The group assignment
{CXI_GROUP=SLOT_0000}links the user to the corresponding slot.
The SO is responsible for slot initialization and user management, while the User account is used for cryptographic operations via PKCS#11 (e.g., GoKeyless integration).
Installation and Configuration of Cloudflare Keyless SSL
Installation of GoKeyless
-
Update the System Packages. First, ensure that the system package repository is up to date.
sudo dnf update -y
This command updates all installed packages to their latest versions to ensure compatibility and avoid dependency-related issues during installation.
-
Install the necessary tools required for downloading and managing packages.
sudo dnf install -y wget curl tar
wget and curl are used for downloading files from external sources.tar is used for extracting compressed archives if required during setup.
-
Install the DNF plugins package and add the Cloudflare GoKeyless repository.
sudo dnf install -y dnf-plugins-core
sudo dnf config-manager --add-repo https://pkg.cloudflare.com/gokeyless.repo
dnf-plugins-core enables repository management features. The Cloudflare repository is added to allow installation of the GoKeyless package directly using the package manager.
-
Install the GoKeyless package from the configured repository.
sudo dnf install -y gokeyless
This installs the Cloudflare GoKeyless daemon, which acts as a bridge between Cloudflare’s edge servers and the private key stored in the HSM.
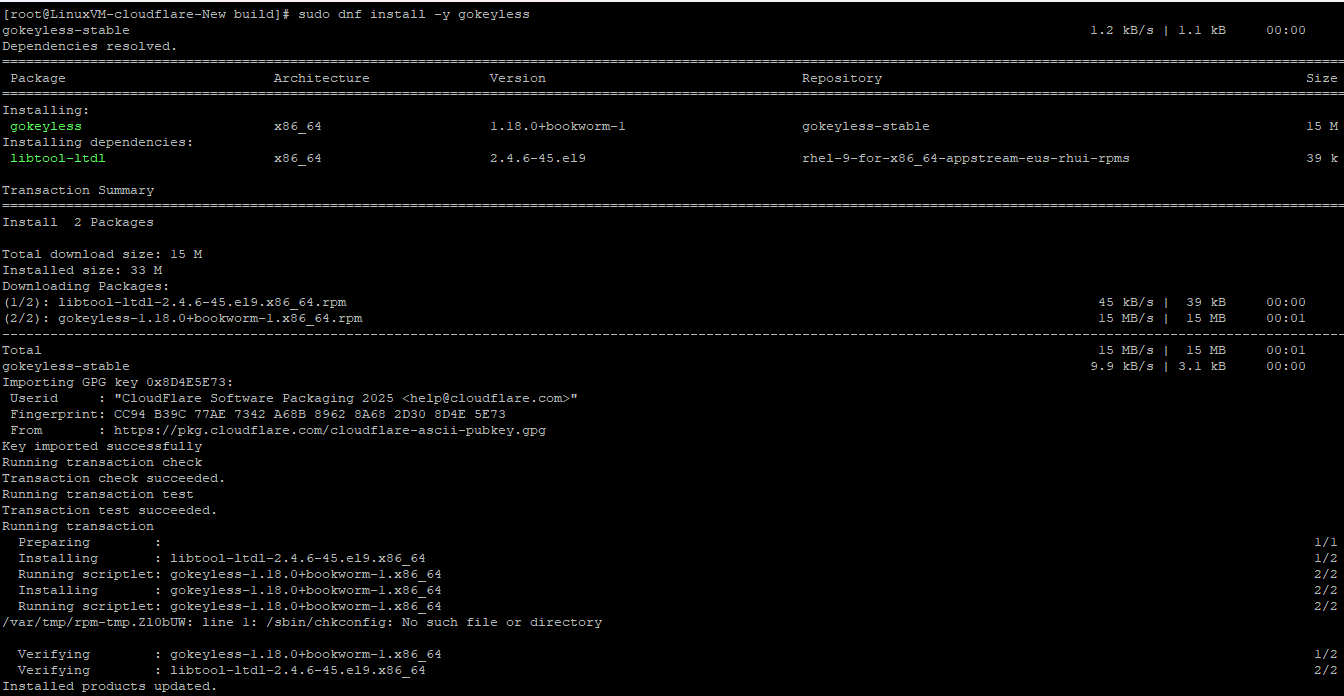
GoKeyless setup and package installation
-
Configure file permissions.
sudo chmod 644 /etc/keyless/gokeyless.yaml
-
Add the required user (e.g.,
build) to thekeylessgroup.
sudo usermod -aG keyless build
-
Check the installed GoKeyless version.
gokeyless --version

GoKeyless version details
Cloudflare Dashboard Configuration
-
Log in to the Cloudflare Dashboard.
Navigate to the Cloudflare portal and log in using your credentials. -
Select the Domain.
After logging in, select the required domain from the list of configured domains. This ensures that all subsequent configurations are applied to the correct domain associated with the Keyless SSL setup.
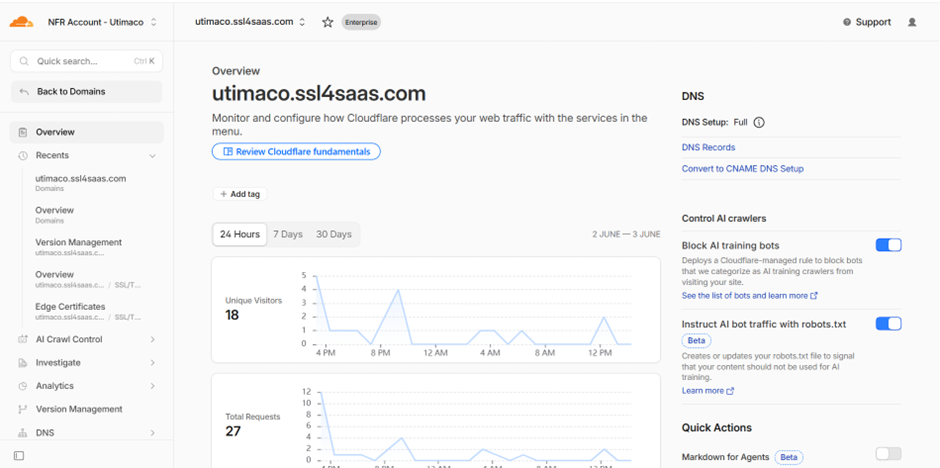
Cloudflare domain overview dashboard
-
Navigate to the DNS Configuration.
Go to the DNS section of the selected domain. The DNS section is used to manage domain records, which are required to route traffic correctly between Cloudflare, the key server, and the origin server. -
Create DNS Records.
Create the required DNS records for both the key server and user-facing application.
Key Server DNS Record
Hostname: kms.utimaco.ssl4saas.com
Type: A
Proxy Status: DNS only (Grey Cloud)
The key server hostname must be configured as DNS-only to allow Cloudflare to directly communicate with the GoKeyless server over port 2407 without proxy interference.
User Access DNS Record
Hostname: utimaco.ssl4saas.com
Type: A
Proxy Status: Proxied (Orange Cloud)
The user-facing hostname must be proxied through Cloudflare to enable SSL termination at the Cloudflare edge and to utilize the Keyless SSL configuration.
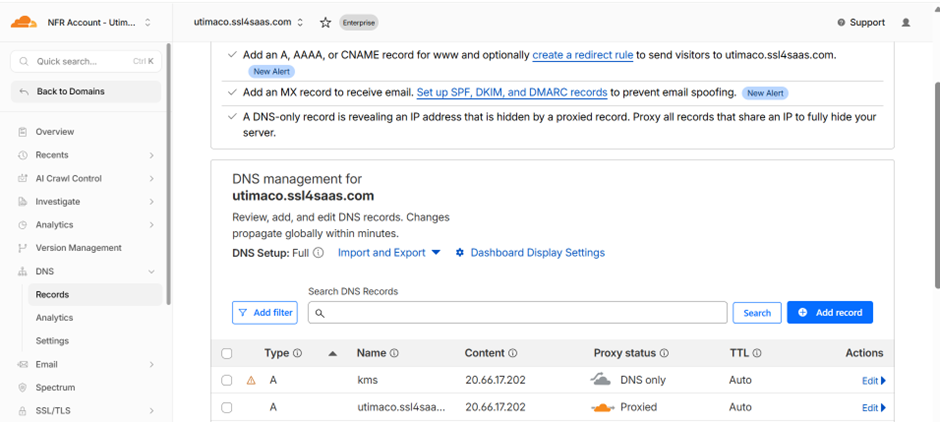
Cloudflare DNS records configuration