
You can recover archived keys. To perform a key recovery:
-
Open the command prompt and run the certsrv.msc command
-
In the console tree, double-click Certificate Authority, and then click Issued Certificates
-
Select View and select Add/Remove Columns
-
In Add/Remove Columns, in Available Column select Archived Key, and then click Add.Archived Key should now appear in Displayed Columns
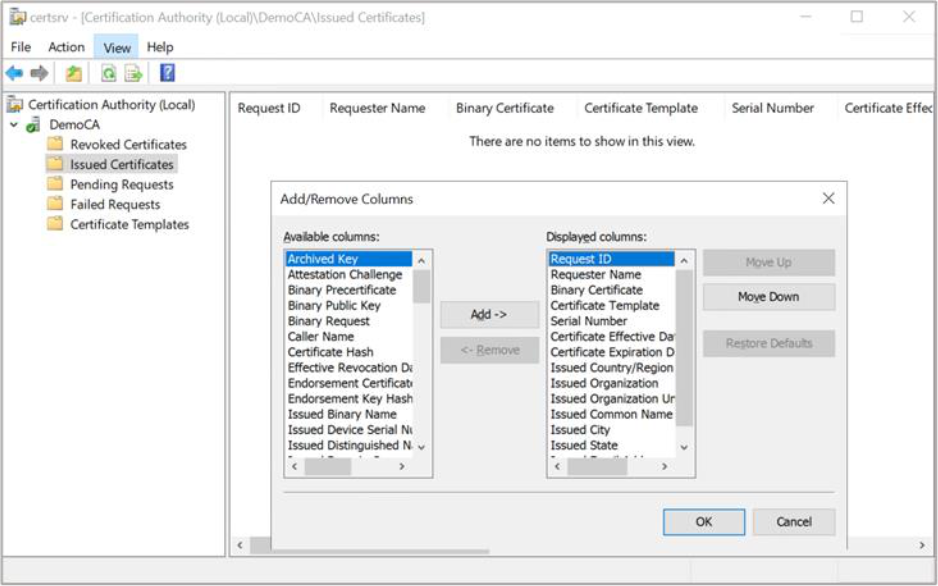
Figure 66: Archived Key window
-
Click OK and then in the details pane, scroll to the right and confirm that the last issued certificate to UserKeyArchival has a Yes value in the Archived Key column
A certificate template must have been modified so that the Archive bit and Mark Private Key as Exportable attributes were enabled. The private key is only recoverable if there is data in the Archived Key column.
-
Double-click the Archive User certificate
-
Select the Details tab and write down the serial number of the certificate
-
Click OK
-
Close the Certification Authority
-
Recover the private key into output file, open the command prompt and run the command below
|
›_ Console |
|---|
|
-
Recover the certificate, open the command prompt and run the command below
|
›_ Console |
|---|
|
If you are using Smartcard Authentication, the prompt will go on the PIN Pad device to insert Smartcard and enter the pin. Then press OK button on the PIN Pad.
-
When prompted, enter the following information:
Enter new password: password
Confirm new password: password
-
Type exit, and then press ENTER
-
Close all windows and log off as the current user
-
Import the recovered private key/certificate
a) Open the command prompt run the certmgr.msc command
b) Right-click Certificates (Current User), and then select Find Certificates
c) In Find Certificates, under Contain type CA Name and then click Find Now
d) In Find Certificates, on the Edit menu, click Select All
e) In Find Certificates, on the File menu, click Delete
f) In Certificates, click YES
g) Close Find Certificates
-
Import the certificate at c:\user.pfx and let the certificates be placed by the system
a) In the console tree, right-click Personal and then select All Tasks and then click Import
b) In the Certificate Import Wizard, click Next
c) In the Files to Import, in the File name box, type c:\user.pfx and then click Next
d) In Password, type password and then click Next
e) In Certificate Store, select Automatically select the certificate store based on the type of certificate and then click Next
f) In the Completing the Certificate Import Wizard, click Finish
-
Verify the serial number of the imported certificate
a) In the console tree, double-click Personal and then click Certificates
b) Double-click the certificate
c) In Certificate, go to the Details tab. Verify that the serial number matches the original